Data Tracker Help
| Spreadsheet View: |
The spreadsheet window displays
multiple records in a spreadsheet format. The spreadsheet is also used to display results. Since you can edit data on the spreadsheet, you can also use
the spreadsheet to quickly update your records. The
Spreadsheet window is completely re-sizeable. Selecting Spreadsheet RecordsTo select the records you want to
display on the spreadsheet use the browse radio buttons on the left hand side of the
spreadsheet window. There are three available
choices: (1)
You can choose to display all of the records by pressing the “All
Records” button. (2)
You can choose to display only records on the Search List by pressing the “Search List
Records” button. (3)
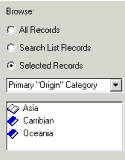
You can choose to browse through selected database records by pressing
the “Selected Records” button. If
you use this option you need to select records to display using the drop down menu and
item list control on the bottom left side of the window (illustrated above). To use these controls first select the type of
records you want to browse through using the drop-down menu (you can browse through data
using the description or detail fields as keys) and then click the desired category on the
list that appears. Once you have selected records to
display you can use the splitter between the spreadsheet and records selection buttons to
increase the spreadsheet size and hide the selection buttons. If a record is available in the
selected display, you can type its record number into the “record number” field
to directly jump to it. While viewing
the Spreadsheet you can check the “Highlight” box to highlight records on the search list.
Selecting Spreadsheet FieldsThe currently displayed spreadsheet
fields appear on the yellow bar on top of the spreadsheet control. If you prefer, you can customize these fields. You can control which fields to display and you
can also control the order in which the fields appear.
To customize the fields click on the yellow bar on top of the spreadsheet,
or press the first button that appears on the Spreadsheet window toolbar. A dialog box will appear where you can add and
remove fields and alter the field order. You
can also change field order by dragging and dropping column headings. The default display includes all of the
Description and Detail fields and the record images.
The spreadsheet must include at least one field. On the spreadsheet display you can select an image
to associate with a record by clicking on the corresponding image field. Once you have the spreadsheet setup to your
specifications you can print it using the “print” button on the toolbar. If you have a very large database
(i.e. more then 5000 records) and a slower computer the spreadsheet may take couple of
minutes to load if you try and display the entire database. |
